
Mastering Shopify Liquid: The Secret Weapon for Your E-commerce Project5

Table of Contents
Learn how to master Shopify Liquid with this comprehensive guide for beginners. Discover how Liquid powers your Shopify store and how you can customize it like a pro, even without coding expertise.”
This meta description is concise and includes key terms that will help with SEO while also giving a quick overview of what the article offers.
What is Liquid and Why Should You Care?
Liquid is the backbone of Shopify themes. It’s a powerful templating language created by Shopify’s co-founder Tobias Lütke in 2006. Think of it as the bridge between your store’s data and what customers see on your website.
Imagine you own a brick-and-mortar store. Instead of manually updating product prices and availability on signs every day, you have an automated system that updates everything in real-time. That’s exactly what Liquid does for your Shopify store!
It dynamically pulls product details, prices, inventory status, and other essential data from your store and displays it on your website. The best part? You don’t need to be a coding expert to use it!
How Liquid Works: The Basics
Imagine you’re at a store, and the prices automatically appear on the register without anyone typing them in. Liquid does this for your Shopify store. It fetches dynamic data—like product prices and availability—from your database and displays it in real-time.
While static elements like logos are built with HTML, Liquid handles everything that changes, like product details and inventory updates. This ensures your customers always see the latest information, without you manually updating pages.
Let’s keep it simple:
- Static elements (like your logo and navigation menu) are built using regular HTML.
- Dynamic content (like product prices and stock status) is handled by Liquid.
- When a customer visits your store, Liquid fetches the latest data from Shopify’s servers and displays it in real time.
With Liquid, you can create a store that updates automatically without you lifting a finger. Sounds like magic, right?
The Three Pillars of Liquid
Liquid is built on three main components:
1. Objects: The Data Holders
Objects are one of the most important building blocks in Shopify Liquid. They contain dynamic store data such as product information, collections, and customer details. When you use an object in Liquid, it acts as a placeholder that Shopify automatically replaces with the actual data from your store.
Examples of Common Objects:
{{ product.title }}: Displays the title of a product.
{{ collection.title }}: Displays the title of a collection.
{{ cart.total_price | money }}: Displays the total price of items in the cart.
{{ customer.first_name }}: Displays the first name of the logged-in customer.
These objects allow you to pull data from various sources within Shopify and render it on your storefront. They are wrapped in double curly braces {{ }} to indicate their dynamic nature.
For more in-depth documentation on objects, visit Shopify’s official Liquid documentation on objects.
Example:
{{ product.title }}
This will be replaced with the actual product name.
2. Tags: The Logic Controllers

Tags are enclosed in {% %} and control how your store behaves. They don’t display content directly but decide what should or shouldn’t appear.
Example:
{% if product.available %}
  <button>Add to Cart</button>
{% else %}
  <span>Sold Out</span>
{% endif %}
If the product is in stock, the “Add to Cart” button appears. If it’s out of stock, customers will see “Sold Out.”
3. Filters: The Data Transformers
Filters are a powerful feature in Liquid, allowing you to modify data to suit your needs. Think of them as tools that format or transform content before displaying it on your Shopify store. Whether it’s changing the case of text, formatting a number, or adding a currency symbol, filters make it easy to adjust how information looks without modifying the original data.
This will convert the product title to all capital letters. Filters are also chainable, meaning you can apply multiple transformations to the same piece of data. For instance, if you want to display the price with a currency symbol and add a “Starting at” text in front, you could do something like this:
{{ product.price | money_with_currency }}
This ensures your prices display with the correct currency format, e.g., $19.99 USD.
Where to Use Liquid in Shopify
Liquid code is used across different parts of your Shopify theme. Here’s a breakdown of where specific templates should be placed:
| Feature | File Name |
|---|---|
| Product details | main-product.liquid |
| Blog posts | main-article.liquid |
| Store-wide elements | theme.liquid |
| Collection pages | main-collection.liquid |
| Cart functionality | main-cart.liquid |
| Homepage content | index.liquid |
Each of these files plays a specific role in rendering content dynamically, ensuring your store remains up to date with minimal effort.
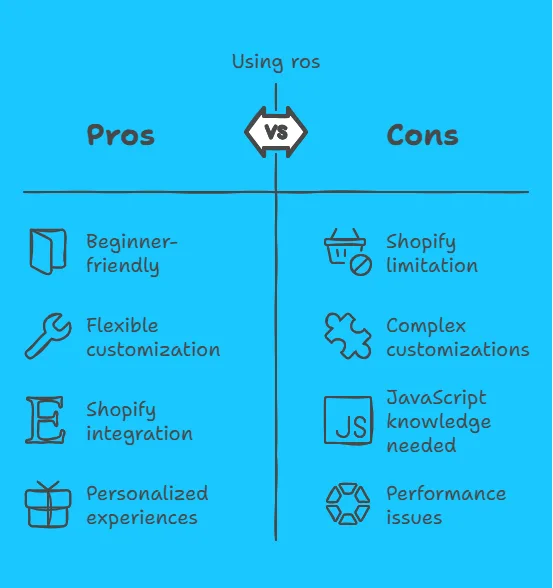
Pros and Cons of Using Shopify Liquid
While Shopify Liquid is a powerful tool, it comes with its own set of advantages and drawbacks. Here’s a quick rundown:
Cool Things You Can Do With Liquid
Now for the fun part! Here are some practical ways Liquid can enhance your Shopify store:
1. Personalize the Shopping Experience

Offering a personalized shopping experience can significantly improve customer engagement and boost sales. With Shopify Liquid, you can dynamically display custom messages, promotions, or product recommendations based on customer behavior. For example, you can show special discounts for returning customers or display tailored product suggestions based on browsing history.
Here’s a simple example of how to offer exclusive deals to VIP customers:
{% if customer.tags contains "VIP" %}
  <div class="special-offer">Here's your exclusive 20% discount!</div>
{% endif %}
This technique makes customers feel valued, increasing the likelihood of conversions. For more on personalizing your Shopify store, check out Shopify’s personalization guide.
2. Display Stock Alerts

Encourage urgency by showing low-stock warnings. Scarcity can drive conversions by making customers feel they need to act fast. Here’s how you can dynamically display a stock alert:
{% if product.inventory_quantity < 5 and product.inventory_quantity > 0 %}
  <span class="low-stock">Hurry! Only {{ product.inventory_quantity }} left in stock!</span>
{% endif %}
This snippet ensures that if a product has fewer than five items left, a warning message will appear. For more insights on using urgency to drive sales, check out Shopify’s guide on scarcity marketing.
Encourage urgency by showing low-stock warnings:
3. Create a Responsive Product Grid

A well-designed product grid makes browsing easier for customers and improves the overall shopping experience. With Shopify Liquid, you can create dynamic, responsive grids that display products attractively across all devices. Here’s a simple example of a product grid that shows four items from a collection:
<div class="product-grid">
  {% for product in collection.products limit: 4 %}
    <div class="product-card">
      <a href="{{ product.url }}">
        <img src="{{ product.featured_image | img_url: 'medium' }}" alt="{{ product.title }}">
        {% if product.compare_at_price > product.price %}
          <span class="sale-badge">Sale</span>
        {% endif %}
        <h3>{{ product.title }}</h3>
        <p>{{ product.price | money }}</p>
      </a>
    </div>
  {% endfor %}
</div>
This Liquid code loops through a collection and dynamically displays four products with their images, titles, prices, and a sale badge if applicable. To improve usability, ensure the grid is styled properly with CSS for mobile responsiveness.
For more details on creating engaging product layouts, visit Shopify’s theme development guide.
4. Add a Newsletter Popup
Adding a newsletter popup is a great way to grow your email list and keep customers engaged with your store. A well-timed popup can encourage visitors to sign up for exclusive deals, new product launches, and personalized recommendations. Here’s how you can create a simple newsletter popup using Shopify Liquid and JavaScript:
<script>
  setTimeout(function(){
    document.getElementById("newsletter-popup").style.display = "block";
  }, 5000);
</script>

<div id="newsletter-popup" style="display:none; position:fixed; bottom:10%; right:10%; background:white; padding:20px; box-shadow: 0px 0px 10px rgba(0,0,0,0.1);">
  <h3>{{ section.settings.popup_title | default: "Stay Updated!" }}</h3>
  <p>{{ section.settings.popup_text | default: "Subscribe to our newsletter for the latest updates and exclusive discounts." }}</p>
  {% form 'customer' %}
    <input type="email" name="contact[email]" placeholder="Enter your email" required>
    <button type="submit">Subscribe</button>
  {% endform %}
  <button onclick="document.getElementById('newsletter-popup').style.display='none'" style="margin-top:10px;">Close</button>
</div>
Best Practices for Newsletter Popups
- Timing is Key: Display the popup after a few seconds or when a user intends to leave the page (exit intent).
- Offer Incentives: Give users a reason to subscribe, like a discount code or freebie.
- Make It Easy to Close: Ensure users can easily dismiss the popup if they’re not interested.
- Keep the Design Simple: A clean and minimal design improves user experience.
For more tips on optimizing email marketing, check out Shopify’s email marketing guide.
My Top Tips for Working With Liqui
Mastering Liquid can be a game-changer for your Shopify store. Here are some expert tips to make your coding experience smoother and more effective:
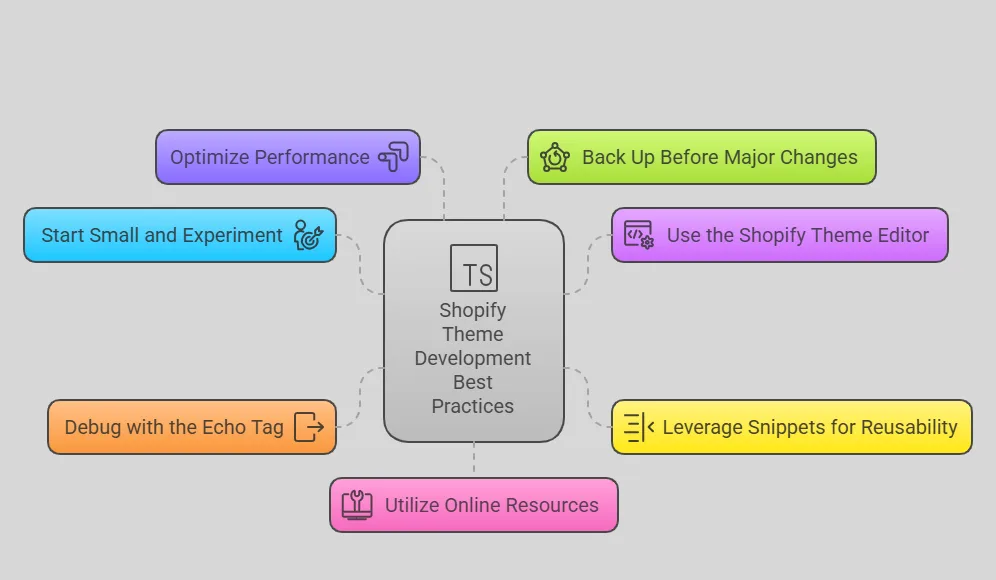
- Start Small and Experiment – Don’t try to revamp your entire theme in one go. Begin with small edits, test frequently, and gradually build your confidence.
- Use the Shopify Theme Editor for Simple Changes – If you’re making minor tweaks like adjusting colors or fonts, use Shopify’s built-in editor before diving into Liquid code.
- Leverage Snippets for Reusability – If you find yourself writing the same code repeatedly, save it as a snippet. This keeps your code cleaner and makes updates easier.
- Debug with the
echoTag – If something isn’t working, use{% echo variable_name %}to print values and troubleshoot issues. - Optimize Performance – Excessive loops and complex conditionals can slow your store down. Keep your Liquid code efficient to ensure fast load times.
- Back Up Before Making Major Changes – Always duplicate your theme before making big modifications. This ensures you have a restore point if anything goes wrong.
- Utilize Online Resources – Shopify has an extensive developer documentation and community forums. If you’re stuck, chances are someone else has solved a similar issue.
By following these tips, you’ll be well on your way to harnessing the full power of Liquid to create an engaging, high-performing Shopify store!
Frequently Asked Questions (FAQs)
1. What is Shopify Liquid?
Liquid is a templating language that connects your store’s data to the content displayed on your website.
2. Do I need coding skills?
No, you don’t need to be an expert. Basic HTML helps, but Liquid is beginner-friendly once you grasp the basics.
3. Can I use Liquid for all customizations?
Liquid works for theme and template modifications. Some customizations may require JavaScript or APIs.
4. How do I edit Liquid in Shopify?
Go to Online Store → Themes, click “Actions,” then “Edit Code” to access and modify Liquid files.
5. Is Liquid the same as JavaScript?
No. Liquid is for templating, while JavaScript handles interactivity and front-end functionality.
Final Thoughts
Liquid is an incredibly powerful tool that makes Shopify flexible and dynamic. Once you understand its core principles, you’ll be able to customize your store exactly the way you want—without needing to be a coding wizard.
Start small, experiment with different snippets, and soon enough, you’ll be a Liquid pro. Now go ahead and make your Shopify store stand out!
Got Questions?
Drop them in the comments below—I’d love to help!
IF YOU REACH AT END, GO GIVE A LOOK AT blogs ON OUR MAIN website.